First, you'll need Keycloak.
Server specs requirements
I'm installing this on Ubuntu 24.04.
Look at this page for more details. TL;DR: Have at least 2 vCPU and 2 GB of RAM for a start.
Installing Keycloak
First need to install the dependencies
Start here: https://www.keycloak.org/getting-started/getting-started-zip
Basically you'll:
# install software
sudo apt install openjdk-21-jdk wget unzip -y
# get keycloak
wget https://github.com/keycloak/keycloak/releases/download/26.1.4/keycloak-26.1.4.zip
unzip keycloak-26.1.4.zip
cd keycloak-26.1.4

# execute keycloak:
# WARNING: this is the development version of keycloak.
# DO NOT USE this in production.
bin/kc.sh start-dev

# When we're ready we'll use this instead:
# bin/kc.sh start
Now you cana take a look at your host, on port 8080:
http://<your-hostname-or-ip>:8080
If you see something like this, that's a good sign:
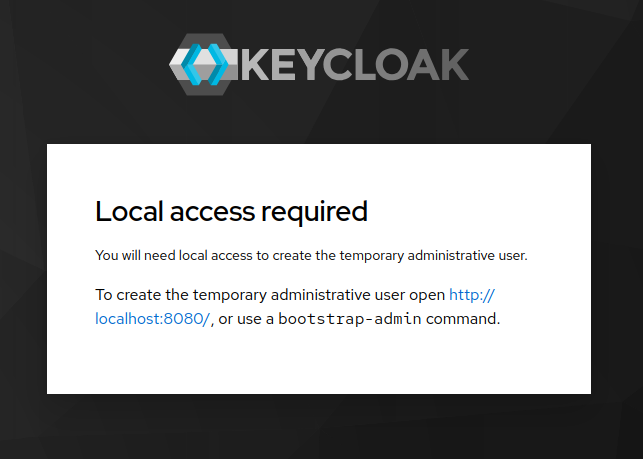
But we won't do the bootstrap-admin command just yet. First, let's make our
setup more production-ready instead.
TLS
You'll need a TLS cert, so get certbot for Let's Encrypt certificates:
sudo apt install certbot -y
# And since I use nginx:
sudo apt install nginx python3-certbot-nginx -y
sudo systemctl start nginx
# Now, confidure the certificate:
sudo certbot --nginx
When you're done setting up your certificate, you can terminate nginx since you won't need it anymore:
sudo systemctl stop nginx
PostgreSQL
It's also recommended that you use postgresql as a db for storing Keycloak's data. So let's install it.
sudo apt install postgresql -y
Then change the default password by doing this:
# open a postgresql client session:
sudo -u postgres psql
# then in your postgres client session:
ALTER USER postgres WITH PASSWORD '...';
# then to quit:
\q
Then connect with your postgres and create the database:
CREATE DATABASE keycloak;
GRANT ALL PRIVILEGES ON DATABASE keycloak TO postgres;
# then quit:
\q
Configure Keycloak
In the keycloak folder you unzipped earlier, you will edit the following file:
conf/keycloak.conf
And put the following (modified to suit your own info):
# Database
db=postgres
db-username=postgres
db-password=secret
db-url=jdbc:postgresql://localhost/keycloak_db

# HTTP
https-certificate-file=/etc/letsencrypt/live/yourdomain.com/fullchain.pem
https-certificate-key-file=/etc/letsencrypt/live/yourdomain.com/privkey.pem
https-port=443

hostname=yourdomain.com
Notes:
Replace
yourdomain.comwith your actual keycloak domain nameAlso, Don't surround your
db-passwordwith quotes, or those will actually be part of thedb-password. You can put anything after the=symbol, until the end of the line, and it'll be part of the password.
Start the server in production mode:
cd bin/
kc.sh start
To show the configurations:
kc.sh show-config
Now, you should be able to access to you domain, on port 8443 in your browser.
For example: https://yourdomain.com:8443 And it should display something like this:

which says among other things, to execute the bootstrap-admin command.
So, in another SSH session, we'll go into the keycloak folder that we downloaded earlier and do:
bin/kc.sh bootstrap-admin user
# and follow the steps...
Now, restart keycloak by going to the SSH session where you started the kc.sh
start command, and do CTRL-c, to end the process.
And now, do:
bin/kc.sh start --optimized
You should now create a permanent admin user.
Go to the Users section in the left menu.
Fill in the details. And create the user.
Then go to the Role mapping tab at the top. Click Assign role.
Click the "Filter by realm roles" button, and you should see admin and a few
others appear. Select those, and click Assign.
Test your newly created user, and when you're satisfied, delete the temporary user you created previously.
Create your own realm
At the upper left, click "Keycloak - master". Then click "create realm".
Enter a name.
Click Create.
Add a client to this realm
Clients are applications and services that can request authentication of a user.
- Client type: OpenID Connect
- Client ID: (The client identifier registered with the identity provider.)
Or if you use Keycloak as your IdP, enter anything you want here. - Click "Next" (to Capability config)
- Client authentication: if your client is a backend app, tick this to "ON"
- Authentication flow: Make sure you check "Implicit flow", as well as "Standard flow" and "Direct access grants".
- Click "Next" (to Login settings)
- Root URL: your hostname without the ending slash (https://someclient.com)
- Home URL: your hostname with the ending slash (https://someclient.com/)
- Valid redirect URIs: Something like:
https://someclient.com/* - Valid post logout redirect URIs:
+ - Web origins:
+
- click Save
Create yourself a new user
In the left sidebar, click Users, then "Create new user".
- Required user actions: it's really up to you, but if you create it for someone else, I suggest you choose "Update Password" or "Verify Email".
- Email verified: If it's for yourself, you can check this to "On" already.
- Username, etc.
- Then "Create".
- Now, go to "Credentials" tab and click "Set password"
- Enter your desired password, and if it's for you, again, you can check "Temporary" to Off if you want. Then "Save".
Conclusion
That's it!
In an upcoming post, I'll show you how you can log in to this Identity Provider (IdP) using PHP.
